Tuesday, 29 March 2016

An Update on Work!


Hello to all!

I have been very busy as of lately with personal and university projects. I will firstly start off with some personal work I have been working on with my friend Chris. I have been working with some TV and Film students from Futureworks on some short films and a documentary. The shot above of me was taken for a behind the scenes section for a short film by Phil Cooper. This short film is to remain a secret for now but I shall talk more about this in the future. This next show was of the first shoot we did, including everyone that was working on the production.

These were shot on 2 different days and with the first shoot going smooth for audio. The second shoot was sadly run into a few audio issues. We planned to use two lav mics for the dialogue of the characters who were speaking. However radio signals were a problem and they could not have been fixed on the set. This meant that all the audio for the shots of the break in were all done by booming with a Rode NTG-2. The sound came through really well however there were some scenes that we decided to record some quick bits of ADR on set.


I have also been on a different set at a bar in Manchester called Cord Bar, who were very generous to let us film there. This shoot is also to remain a secret but I can show you a behind the scenes look as shown below.

This shoot went smooth with audio. The equipment that was used were a Zoom H6 recorder, a Rode NTG-2 boom microphone and also two lav mics which were working perfectly on the shoot. This made recording for the shoot go easy with no flaws. It was going too smooth for Chris and I. So we decided to record some boom shots from underneath the bar for some shots so we could get even closer to the talents without being in the way of the shot. This did involve us lying down on the floor of behind the bar but it was an experience which got us some great results in the end game.


Lastly Chris and I worked on the audio for a documentary presented by Jack Naven which included special guest Matt Bloom talking about the complexity of the film and TV industry. This was an interesting shoot as it involved us following Matt to start off giving food to the homeless of Manchester and then for me it was a strange task that I had to do. I had to both sound mix and boom operate whilst walking backwards throughout a section of Manchester whilst Chris was protecting the camera man form bumping into anything. I have been told sadly that that part of the shoot was not used, however it was pretty fun to do. There are no photos of this shoot however I will keep you updated on how this is going throughout the coming months.

With personal work out of the way I shall now tell you what I have been doing for my university course. I have been overloading myself with the threats of deadlines which start in April. However I have everything in placed to be put together and finished! Firstly I have been working on some game audio. This is the project that I have been enjoying the most because I am working with something I am passionate about which is games. I have learnt the basics of blueprint scripting in Unreal 4 and have been using a combination of recorded and library sounds to create some of the best sounds for a game level. The level I am working on is a Strategy Game Template which can be found on the learn section of the epic games launcher that comes with the engine. This template was strapped from all of its sounds and I have been working with different concepts of sounds and how to go around making a tower defence game fun to listen to. I made sure that the game level was not to be over saturated with sounds so the user can have a great listening experience as well as making sure no sounds repeat exactly the same which would be detrimental to the game. There will be a video about this very soon showing off what I have done with the level as I am right now in the final stages of mixing. There will also be a more in-depth review of what I have done on my portfolio which will be updated in the future.

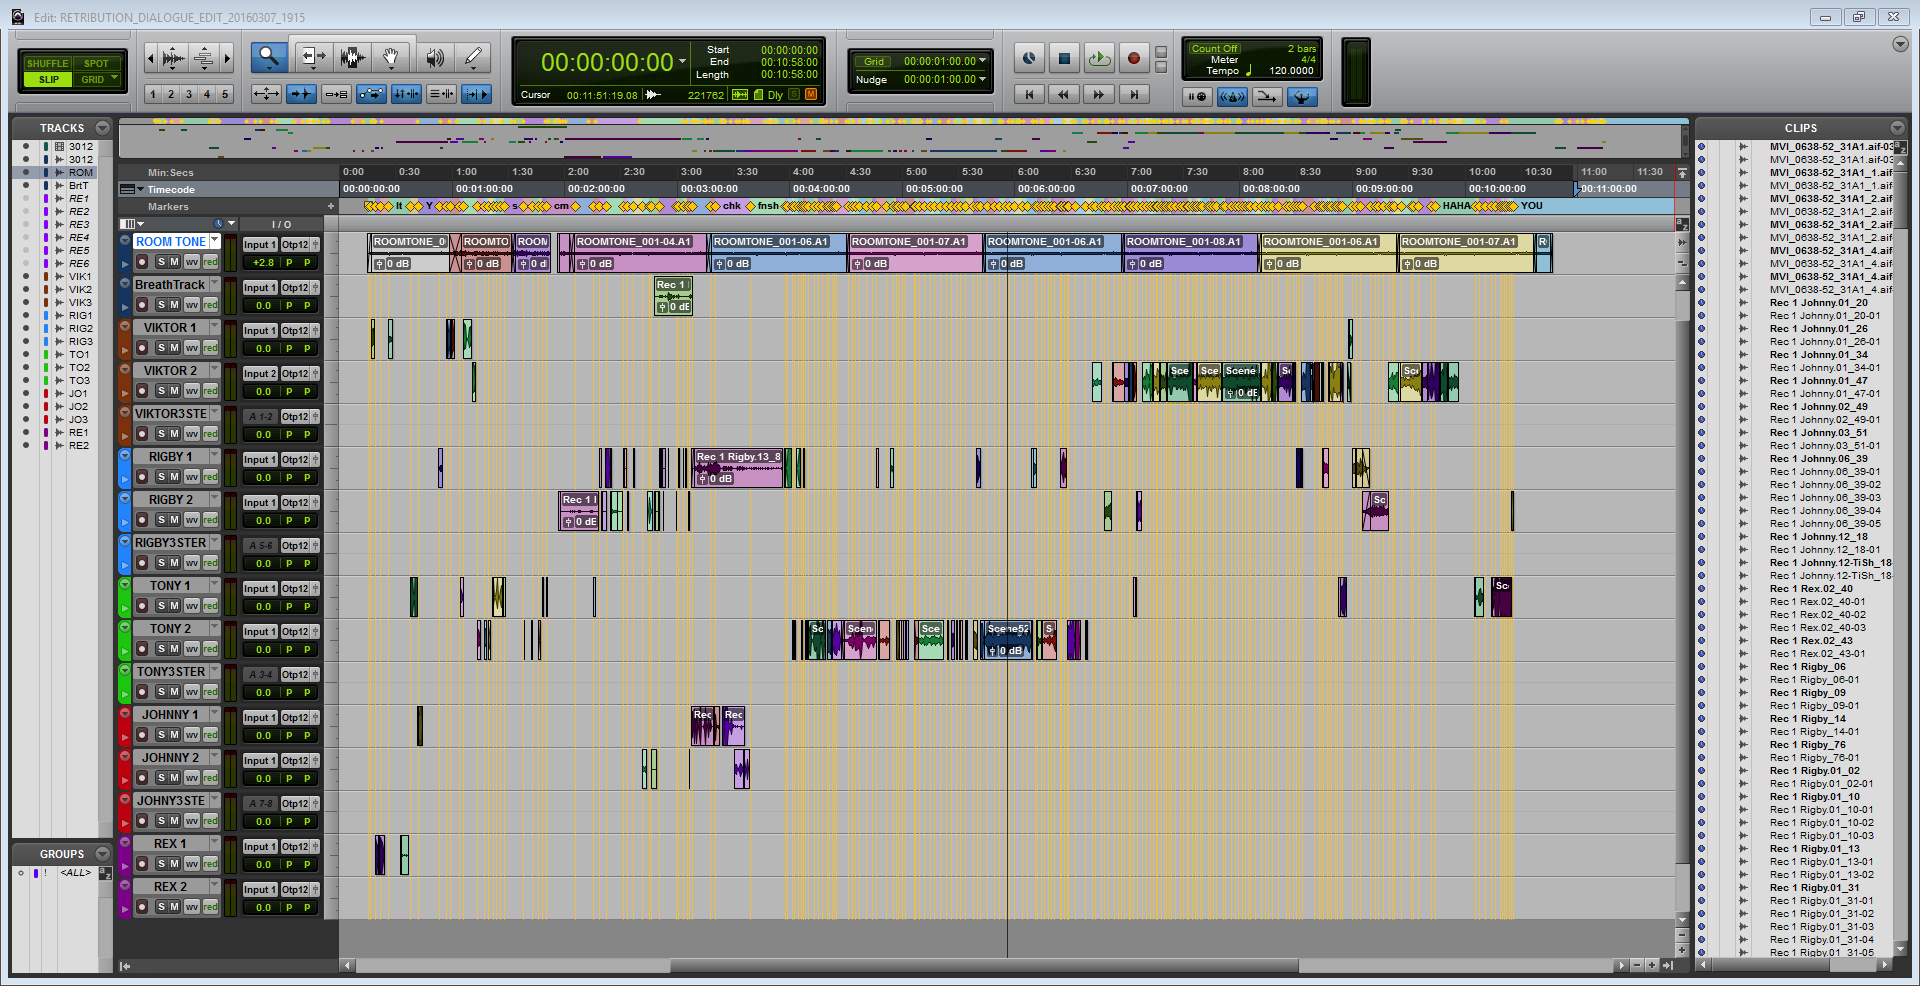
For this next piece of work that I have been working on I have signed an agreement not to mention the film so I shall be talking about this in as much detail as i can but without mentioning the film, respecting the rights of the director. I have been working on the dialogue edit for a film which includes a lot of tense and action moments within the scene. My job is to get the best out of the dialogue and make sure that the dialogue is as clean as it can be. I shifted through 200GB of on set and ADR audio as I wanted to find out the best takes for the edit. However there are some parts that could not be replaced such as breaths that came after someone being injured. This made me go crafty as I created a track dedicated to breathing that could not be replaced and looped a longer breath sequence from another shot to try and make the scene flow and not sound jumpy between shots in the footage I am working with. I wanted to be creative with reverb making the space in the room well used as the scene was shot in what looked to be an abandoned office space. This would make the shots extremely reliant on reverb to create the best effect. However I wanted the reverb to be present but not too much when no one is screaming or shouting in the scene. When someone shouted in the scene I wanted the reverb to reflect upon the feelings that the character is feeling. This involved reverb processing on an audio clip that already had an inherent reverb to it without processing. I wanted to work with the audio clean however it could not have been replaced. so using the best take I could that portrayed the characters emotions well I made the choice to add reverb to it and worked with it. In the end it turned out to work well and when it was played back it made the feel of the room being full of anger and frustration which is what the character was felling at the time. 

This is all I can update you guys on for now! Stay updated right here with what I am doing as there is a lot more coming in the upcoming months!

Wednesday, 16 March 2016

Dialogue Editing for Film - My Experiance


Hello to all!

For the past week I have been working on a dialogue edit for a film and thought I would share my experience working with dialogue in film. Before I started to do the edit I first wanted to research what I am getting myself into. Taking information from Dialogue Editing for Motion Pictures by John Purcell, dialogue editing is described as "Removing the film making from film." this is due to the fact you are removing sounds from the film set so the viewer can focus on what is being said by the talents. Before you even start to the dialogue edit you must watch through the film copy provided by your client so you can take notes about what you have to start doing. You also have to manage your time of work before you start to do the dialogue edit because you never want to spend too long working on the same project because mistakes will be made after long periods of working. This also leads to the days of working where it is best to space the days you are working with the dialogue because as mentioned before, too much time on one project can lead to problems. It is best to work in a quiet environment when working with dialogue. This is because you need to make sure you can hear everything that is going on in the edit you are working with. If you have background noise whilst you are working, you will not be able to grab the frequencies that show the most in the audio. 

The next step that you can do is to sync the OMF or AAF files you get from the client for you to work with. This is so you know what to expect to work with when it comes to finding the best takes. These file types contain the scenes and shots of what were used for the video edit and it is the dialogue editors' job to find these sections and find the best audio takes. If there is no hope for the scene, ADR is usually the best result. However this is sometimes frowned upon because of the costs of bringing in the talents and studio hiring. It is also best for when you are doing the dialogue edit to work with a session template so you can easily organise your work and easily figure out where to put the audio for certain characters, scenes and shots. 

With some research done I felt like I was then ready to start the joys of dialogue editing. To start I synced the AAF file received with the clients film and spotted the dialogue within Pro Tools using markers. This personally made the job of finding scenes that bit simpler. However the naming conventions used on each take did not match the scenes that were shown in the AAF import. I found out later from the director that they improvised most shots to try out different takes for the feel of the scenes. This made finding the best take a bit of a challenge. To make the job of searching through 200GB of audio, I used the workspace window in Pro Tools to help search through the final scenes of the whole production audio because I am working with the final scenes of the production. This then expanded into searching for plenty of parts of ADR for shots that could not be replaced with set audio and for noise reduction plugins to come in and help with eliminating background noise in the set audio. The noise reduction plugins I used were created by Izotope, and in many cases during the edit, the plugins provided were a God send as this helped with so many times that audio clipped, crackled or just had too much noise, but the take was too good to lose. With the amount of times that these plugins saved the audio I would recommend Izotope to anyone who works with audio.

I spread my days out working with the dialogue and made sure I did not exhaust myself and took up to 2 weeks to complete the dialogue edit which totalled up to 10 minutes of dialogue. Below you can see a final example of what the session looked like after the process of editing.


Tuesday, 1 March 2016

The Feeling of Sound

Hello to all!

In this post I am going to be talking about my personal opinion on the feeling of sound. This is something that all sound designers and anyone in a sound department should employ into their work ethics.

Sound in pretty much anything you see or hear today will always have a massive impact on how you feel. Whether this will be emotionally or just that gut feeling you get when you have just seen or heard something awesome or sad for the first time. This is in music, films, TV shows and games. Going into depth about what I am trying to portray is that the sound designer, music composer, audio mixer and everyone else in the audio department, always thinks about the way they want the viewer to feel when these moments happen.

Games are a perfect example of this theory mostly because instead of focusing on what is going on the screen and some ambience's like films and TV shows, designers have to build a world for the player to be engrossed in. Take a game like The Last of Us for example. A game about a zombie apocalypse, that starts off as everything being normal. Instantly however you notice something is wrong. You get the feel of isolation from having very few sounds playing in the background and focus on the dialogue. The music is also played with few instruments as possible to back up the feel of isolation but to also make the connection with the relationship between the Joel and his daughter.
The sound effects in this scene such as the explosion from a distance are made to be sharp to make it feel like you are in the house with her. When the first explosion has happened you can hear distant dogs barking and car alarms ringing which symbolise the chaos of what is about to happen. As the scene is not chaotic as of yet this creates unease for the player making them have this sense of fear of what is really going on in the world.

If you watch the whole scene you can really tell how much depth and planning went into making this scene whole. Watch it below and have your say in the comments what you think about the scenes audio or even just the scene in general (Yes it is an emotional roller coaster but it is a very good example!)


This is what audio departments expect you to achieve when you are working on a project with them. If you are able to get that cinematic feel to have a bigger impact on the audience. You have succeeded as a sound designer.

Wednesday, 24 February 2016

ADR discussion with Doc Kane


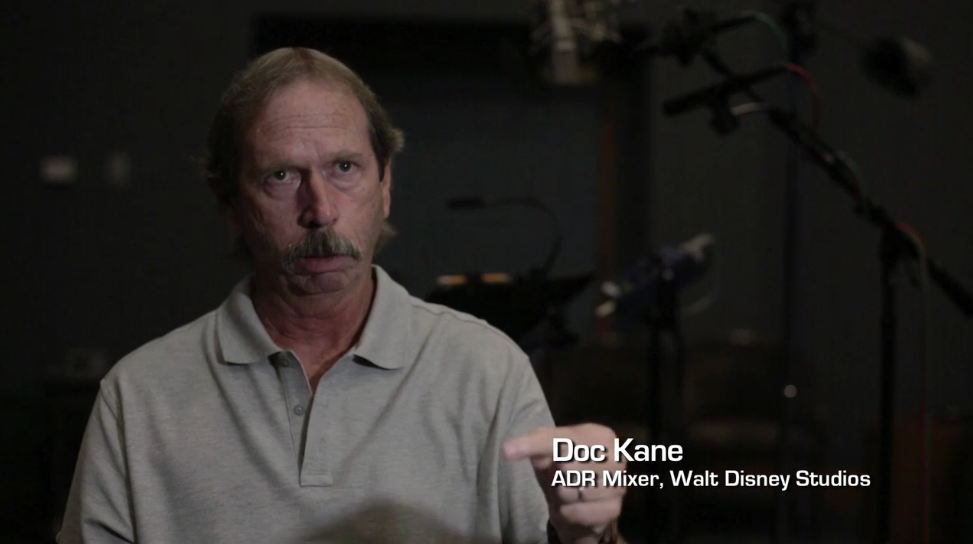
Doc Kane is described as a veteran ADR Mixer. This is due to his credits and how he knows his way around ADR and can tell you anything about it. I found an interesting video from SoundWorks about his work with Disney and how he got involved with ADR. In the video he goes to talk about how ADR (or looping) was done back in the older days of the ADR process and is glad he was not doing ADR back then. He goes on to talk about how they did ADR for the Disney film, The Little Mermaid. It is a very interesting watch and do recommend watching this if you want to get into ADR. The video can be found here - www.soundworkscollection.com/videos/veteran-adr-mixer-doc-kane-of-walt-disney-studios

Monday, 15 February 2016

Character activated sounds: Unreal 4 tutorial

Welcome to another tutorial for audio in unreal engine 4!

Today's blog is going to be about spot sounds for certain characters. This includes creating a collision box and giving it its own parameters through the project settings and via the blueprint editor.

For future examples I am going to be using a silent version of the strategy game level provided by the Epic Games Launcher.

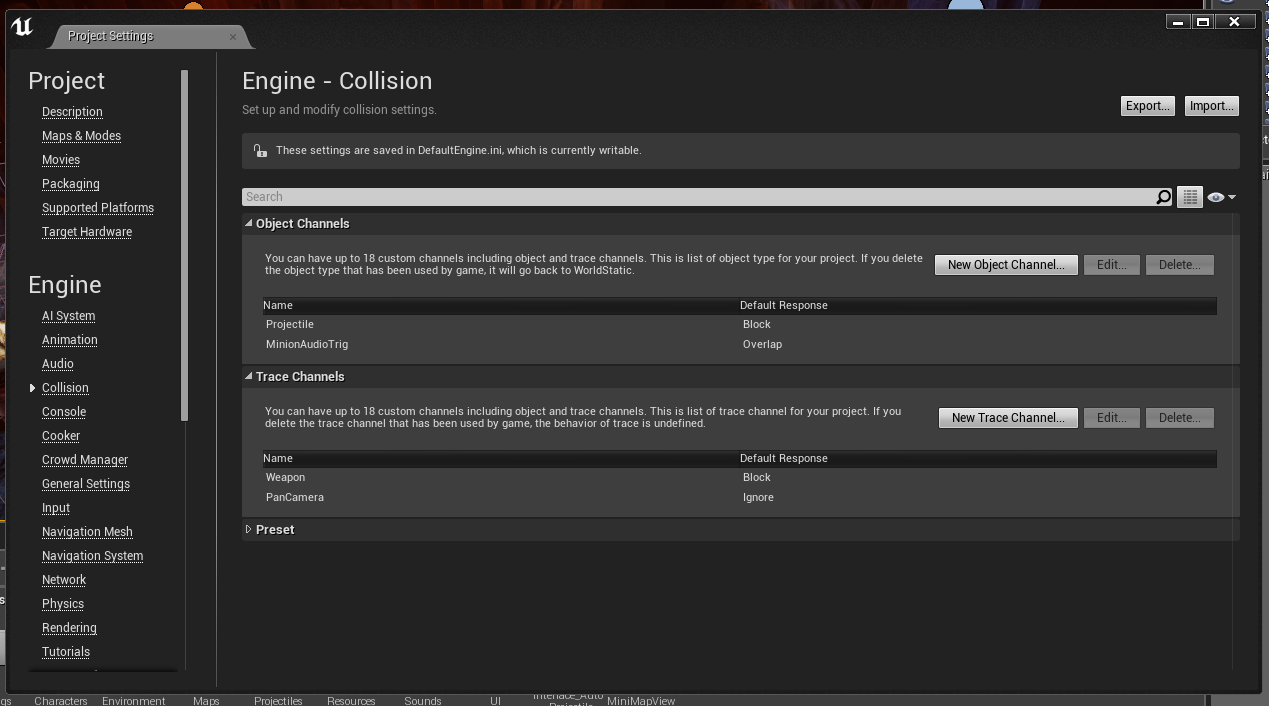
To start of creating a spot sound for your level you first need to add a new collision parameter to the engine. You do this be going into the project settings for the level editor. In the pop up window there is a collision sub menu under "Engine". In here you need to create a new object channel and give it a suitable name for your audio trigger. The following example is named for the minion asset so I called it "MinionAudioTrig". The default response to this was set to overlap so the engine knows what to do with this new channel.


The next step is to apply the newly created parameter to the character you wish. to do this you must see the blueprint for the character through the Viewport window in the blueprint editor.


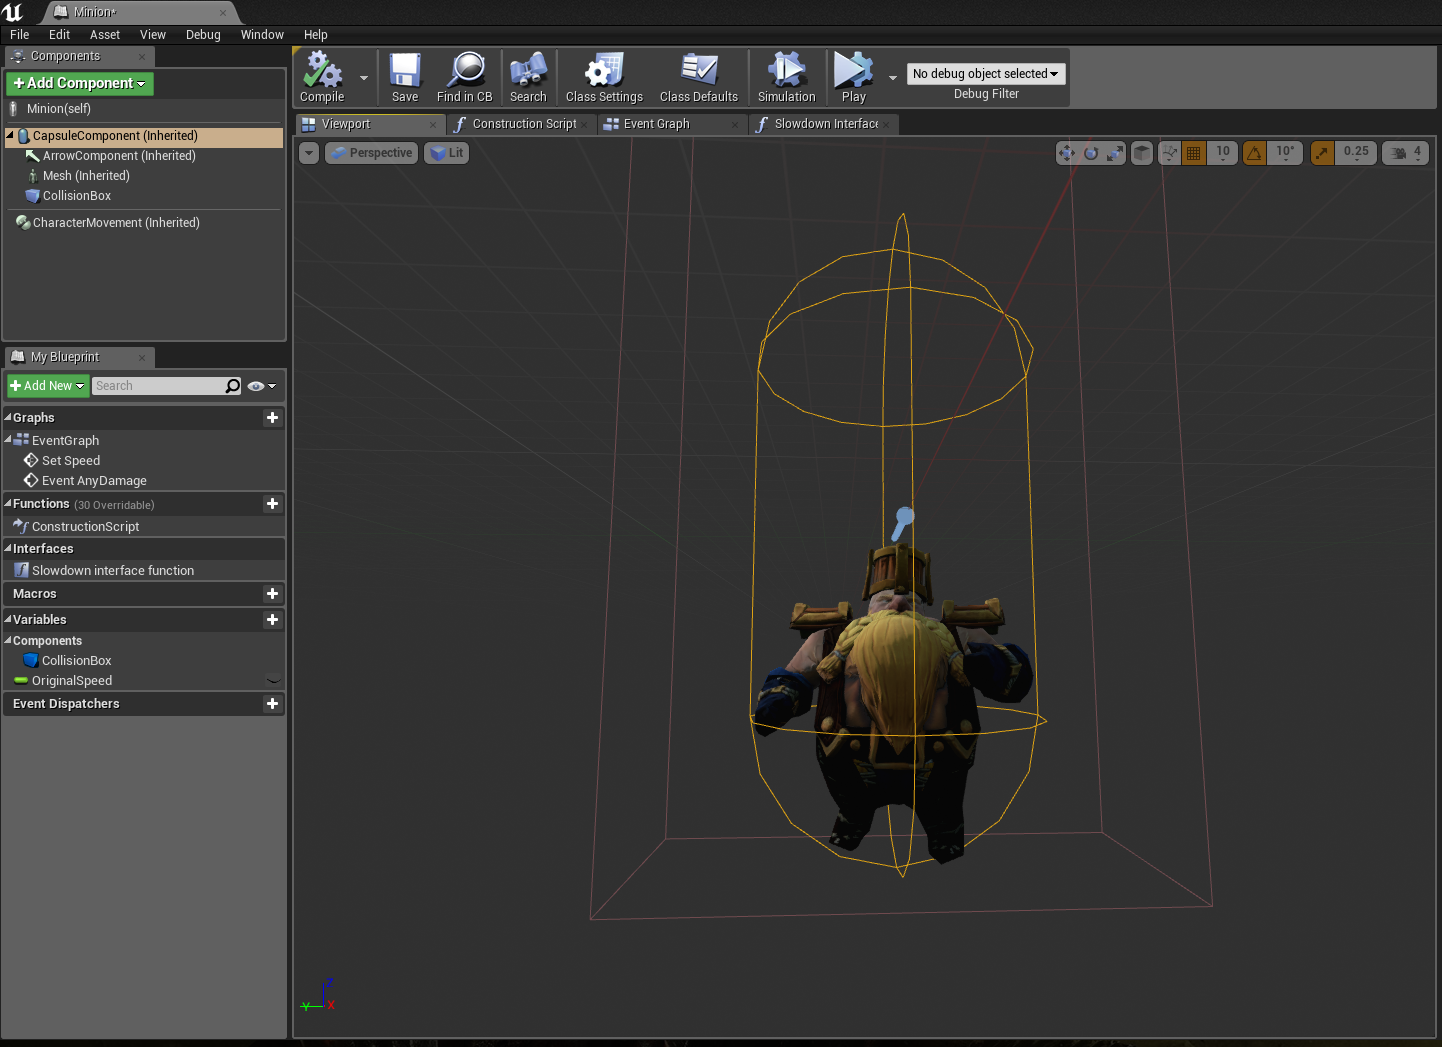
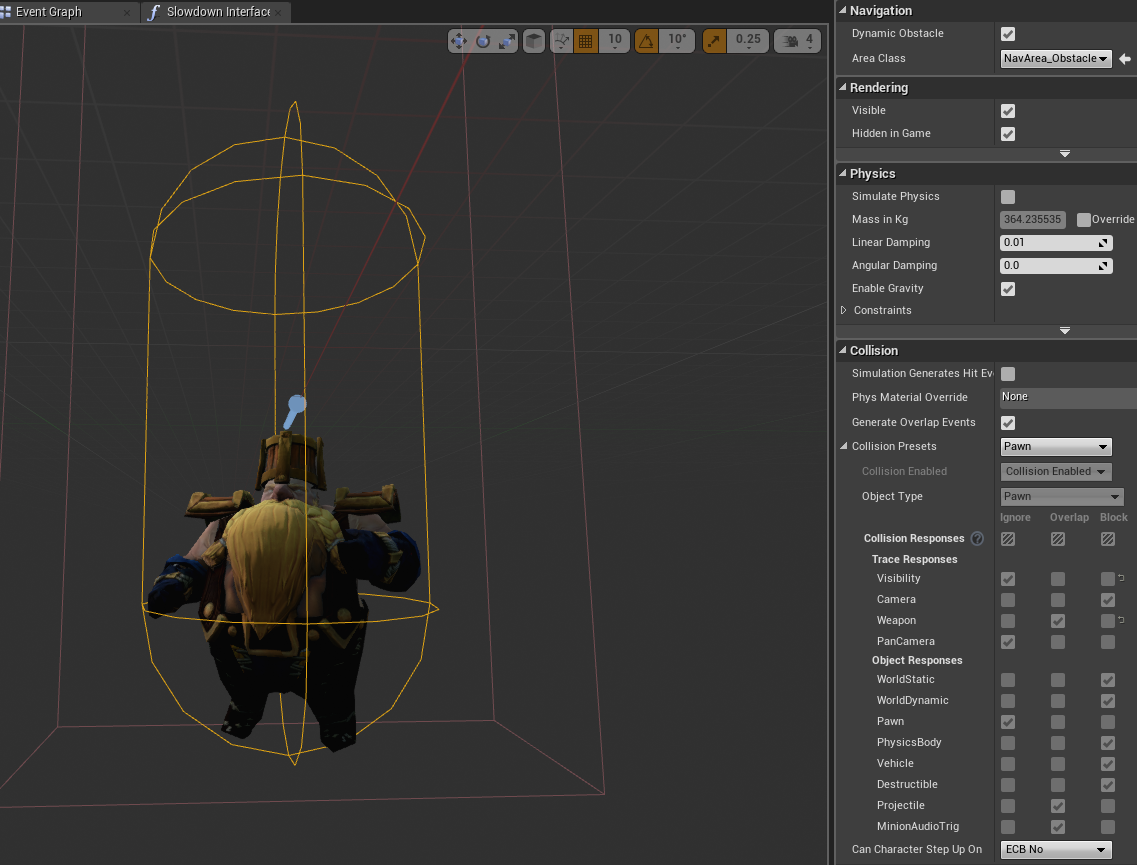
When this window is open you can see the character asset with its assigned collision boxes. This particular character model has two collision boxes. This is not a problem for what you want to do with the new collision parameter. You are going to want to click on the sphere collision box. You then find your way over to the collision properties on the right of the blueprint window. Then set a collision preset to "Pawn" This keeps all of the pawns game mechanics together along with your newly acquainted property which in this case is "MinionAudioTrig"


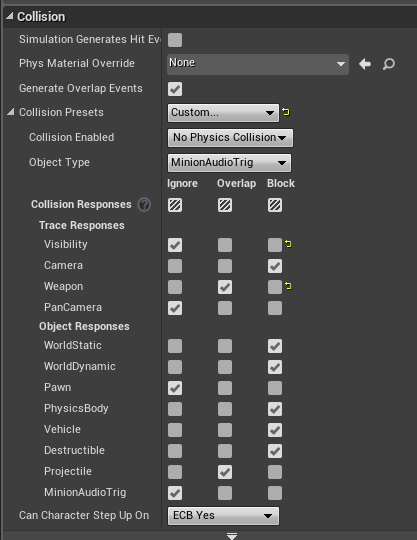
For this case I want to make sure that the outside collision box does not trigger any sounds when the blueprint is complete. When clicked on it will bring up the same parameters that were in the last collision box. Now however you are going to make a custom preset. To do this you need to select "custom" from the collision presets. After that you will need to select your object type, in this case it will be "MinionAudioTrig". After that you then need to select the collision response for the audio trigger which is located at the bottom of the check boxes. This should be set to ignore. Now there should only be one working audio trigger for the asset.


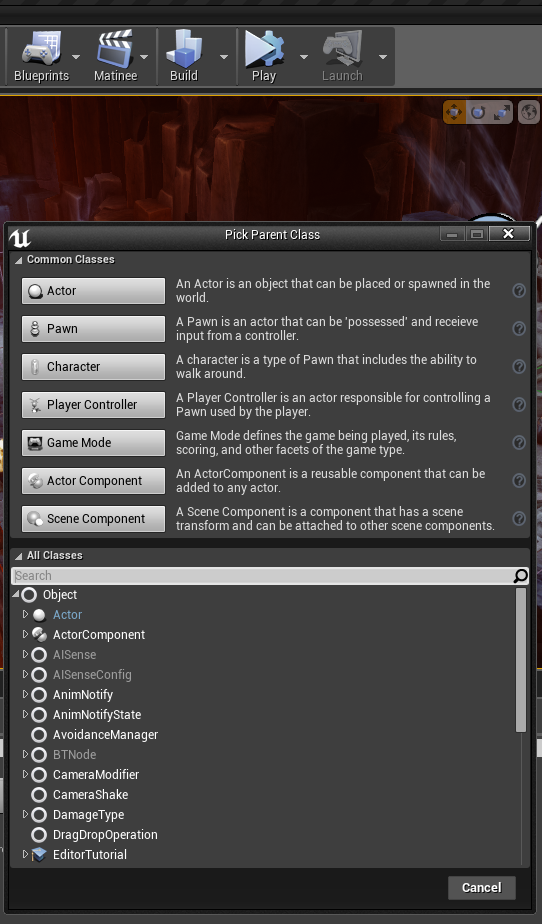
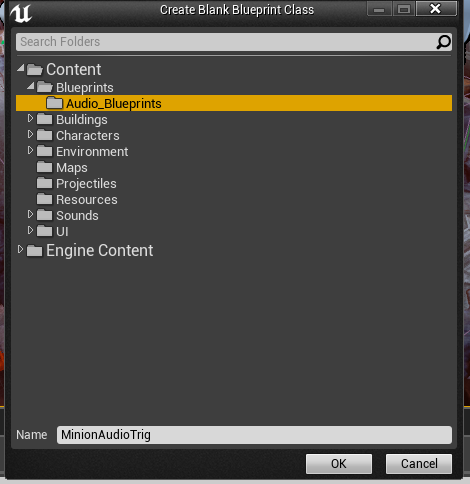
This is where the fun starts. Blueprints. To start off you are going to create an empty blueprint class. When you select this option from the blueprints drop box you need to choose a new actor. This will be your hit box for the collision action. When you select actor you need to give this new blueprint a reasonable name and location of save.


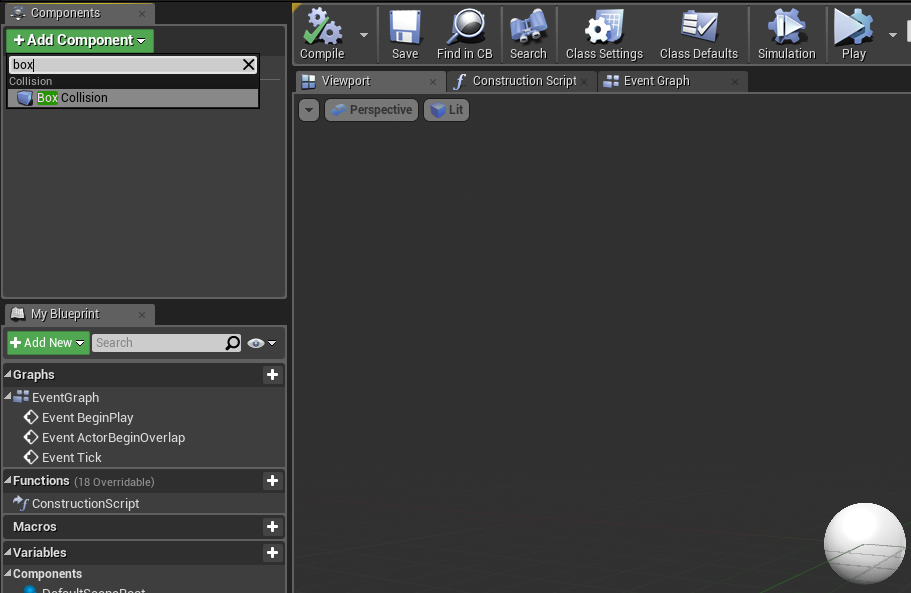
After that procedure is finished you will be presented with an actor ball which is the heart of the blueprint. You need to add a collision box to this. the collision box is used as the hit box for the minion sphere which we sorted before. The audio will play when these two boxes cross each others path. To do this you need to add a new component, which is located at the top left of the blueprint window. When you find the add component drop down window, search for "Box Collision". This will be the hit box.


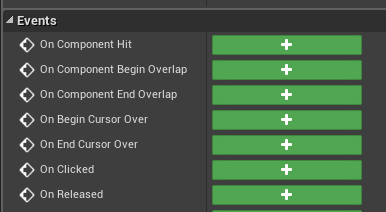
After this has been created you need to add a new event whilst the collision box is still selected. This can be found in the "Details" panel on the right of the blueprint window. Scroll down this panel until you see events. You must select "On Component Begin Overlap" to start your blueprint code.


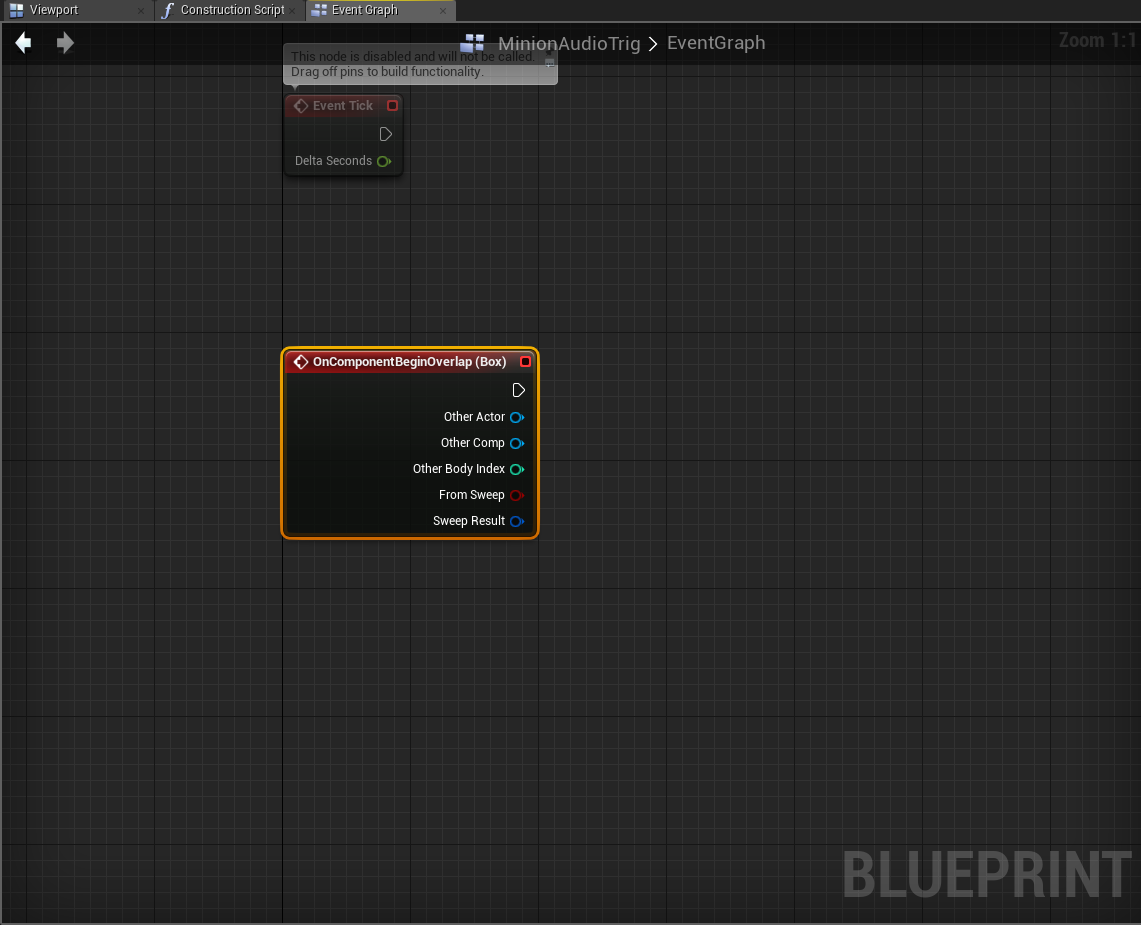
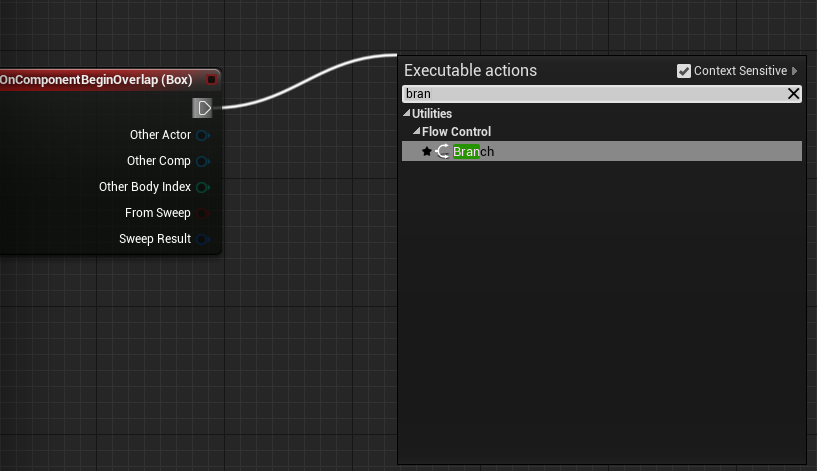
You will then be introduced with the start of your blueprint code. This is where everything is done in the game engine. The first thing you need to know is that most code in blueprints are dragged out from other pins in nodes. The first node you are going to want to drag out is a branch node. This is dragged out from the top pin in the start of your blueprint code. You click and drag this pin into empty space and you search for branch in the search bar. This search function is your best friend, never not use it! A branch node is then formed where you dragged the node to be placed.


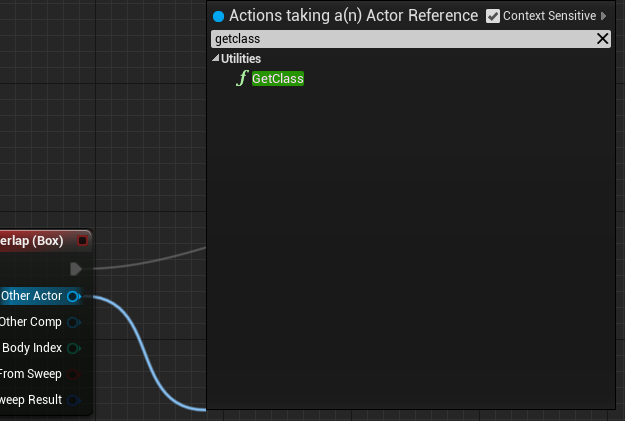
This branch is so you can have flow in your code of true or false (also known as 0 -false and 1-true). On the pin beneath the pin shown above called "Other Actor" You need to link a "GetClass" function up to this pin. This is important as you will need to select the minion blueprint in this node to make sure the code knows what it is doing the following blueprint to. (Note: the GetClass you need to use is a utility! And the name has no spaces.)


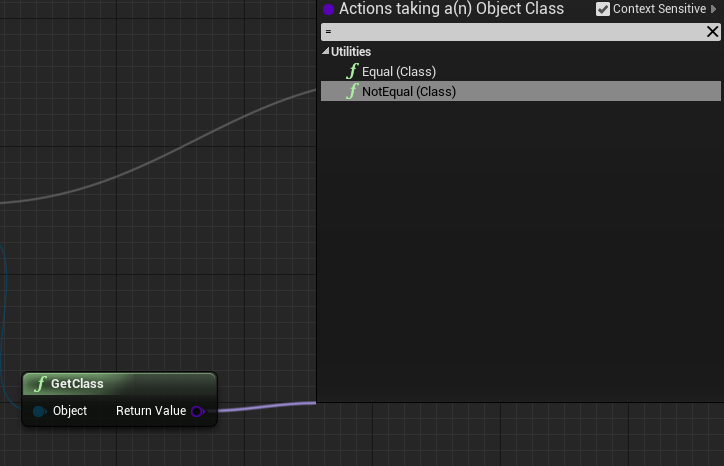
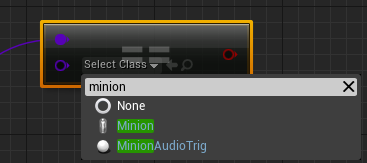
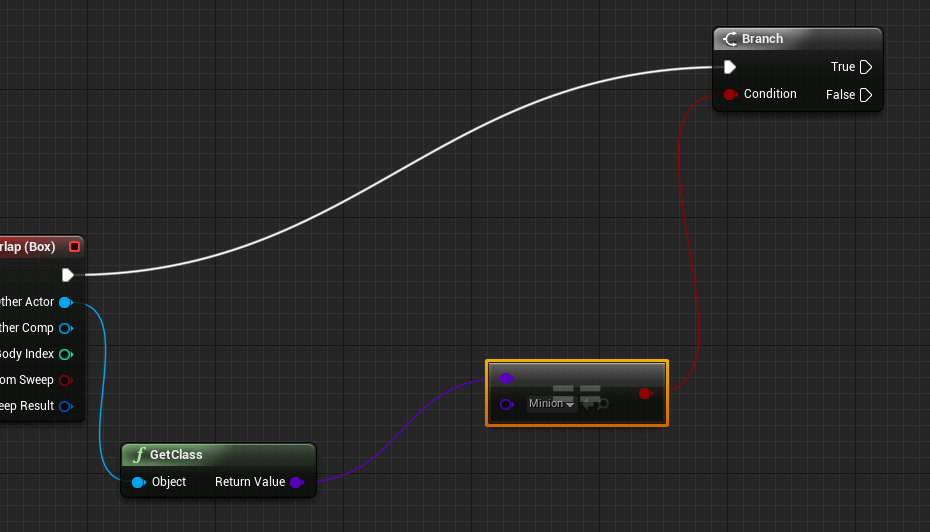
From this node you need to drag out a return value. This is called an "Equal (Class)" This node will be reasonable for selecting the asset you want to apply the function to. This is shown from the drop down menu from the new Equal (Class) node. In This instance I will be selecting my Minion Class as that is going to be my character that is going to activate the audio trigger. This node should then be linked up with the branch which was created earlier, pinning into the "condition" pin. The following sequence of images will give you a visual guide to these actions.


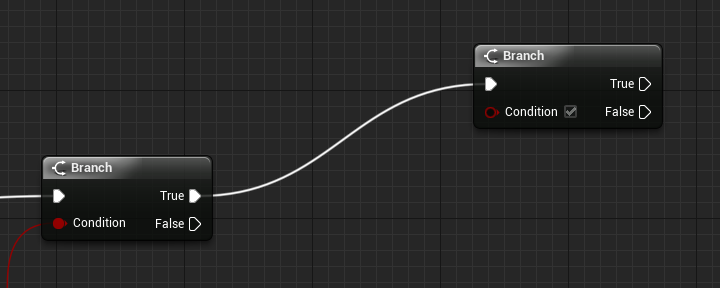
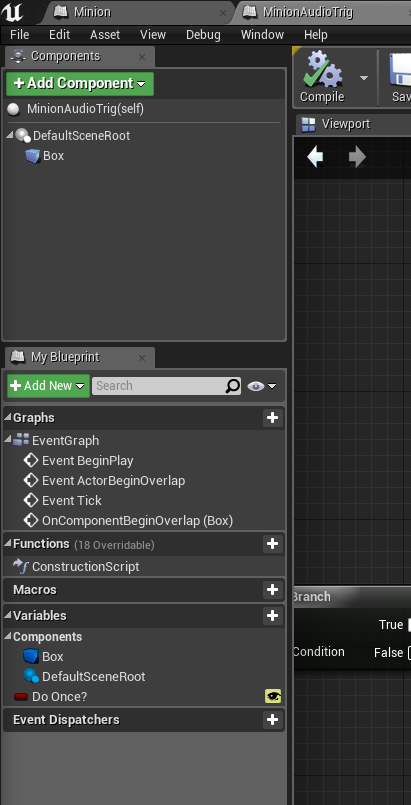
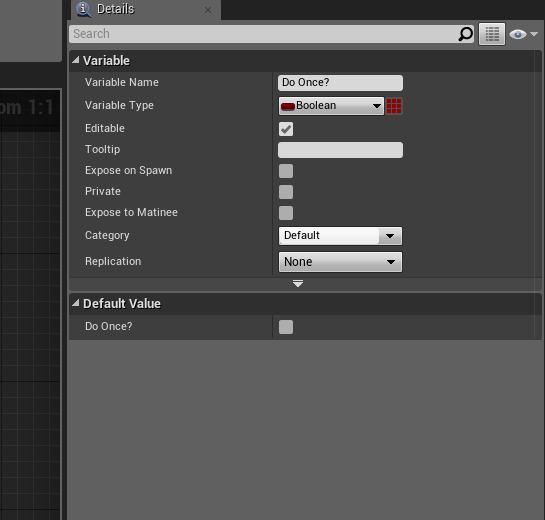
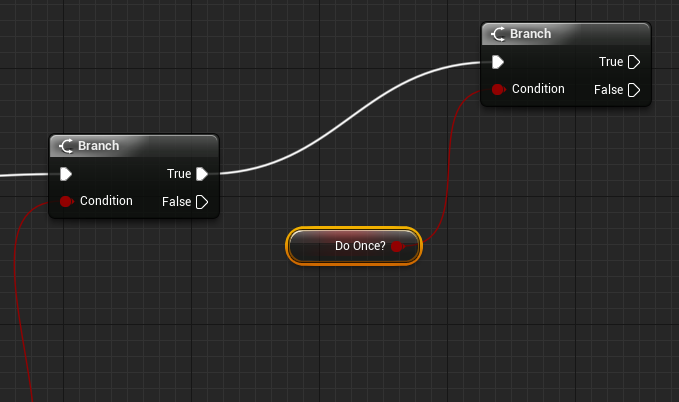
This next step is to show you how to create a variable. This specific variable I will be showing you will be showing how you can make a sound happen only once and never again without having to create a brand new blueprint. Firstly you need to make another branch from the "True" pin on the previous branch. You then need to look at the "Variables" menu on the left of the window and press the plus button next to the name of the menu. This creates a variable for the code. Give this a name of "Do Once?" as this will be available to you in your parameters outside of the blueprint window. It is important to mention the properties of this variable which can be tweaked in the details panel. The variable type "boolean" is basically an on or off switch. Other variable types do different things which we will get to later. There is a box which will be at default unchecked which will be the "editable" check box. You want to tick this box as it makes the "Do Once" mechanic be available to you in the edit window.

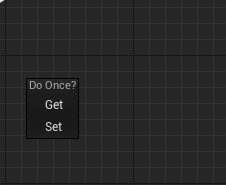
After you have done this you want to drag the variable from the variables tab on the left of the screen into open space which will bring up a selection box with the options "get" and "set". These options do different things. The "Get" value just created the variable for you to place into the code and be able to link up to a condition so the blueprint will be able to get that value when active. The "Set" value lets you put a part of your code into the variable so you will be able to set some settings for the code at that specific point in time. For this "Do Once" feature you need to select "Get" and then when that is placed into the blueprint you must link that up with your second branch. The following image of sequences shall give you an idea what to expect to see in order.


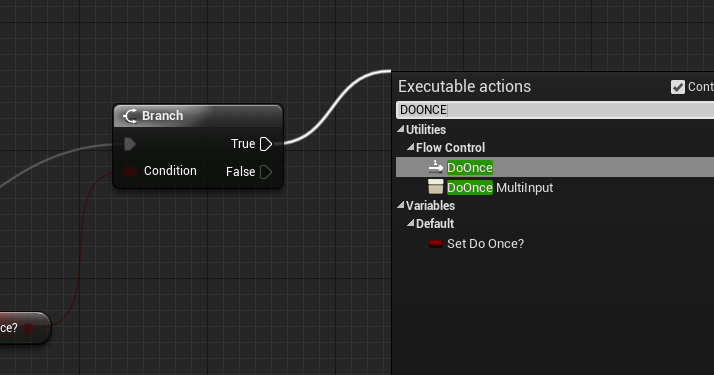
After this code is complete it is important that you compile and save this so you do not lose it in the event of a crash. You now need to give this variable its function. To do this you need a new node from the true value peg on your second branch. Search for "DoOnce" and you will find the function for the do once mechanic.


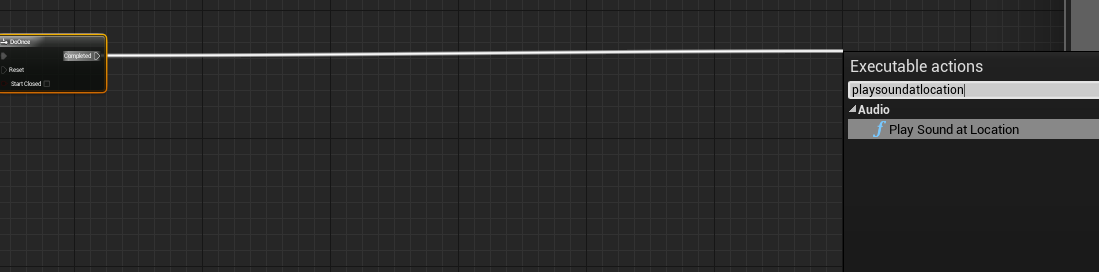
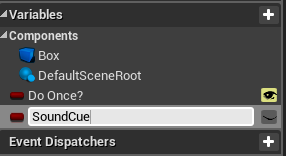
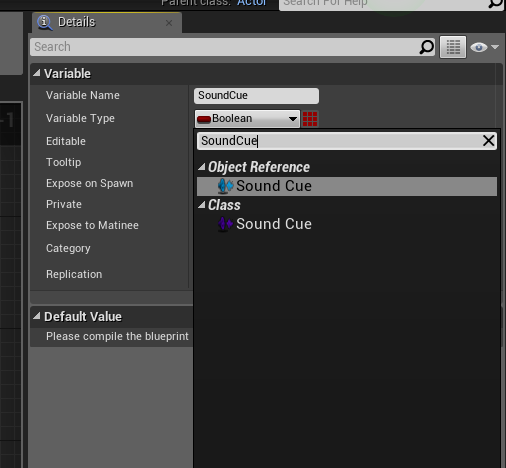
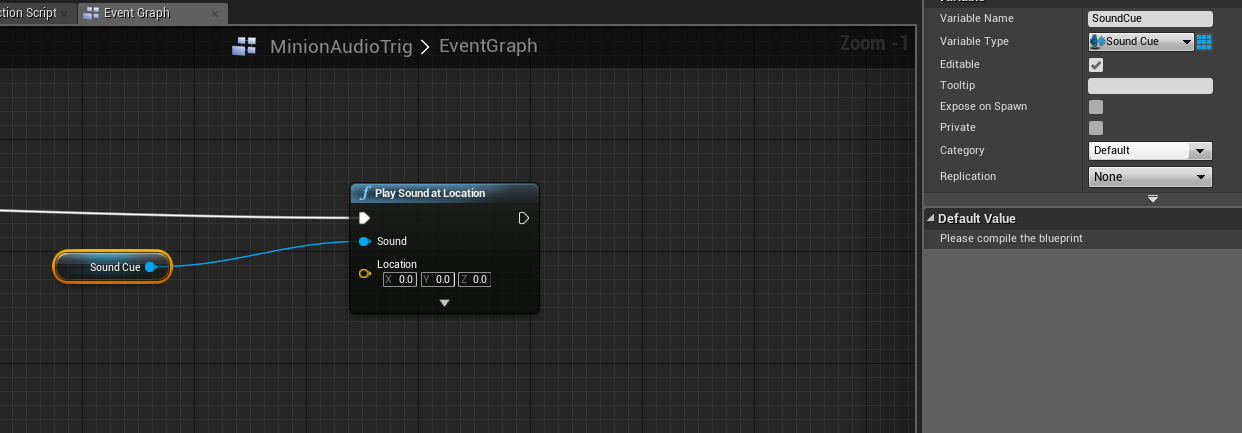
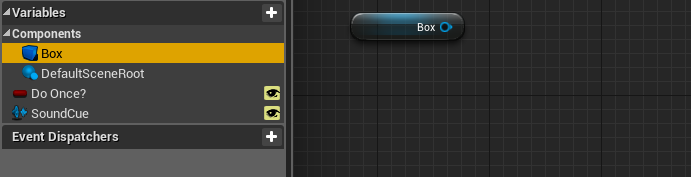
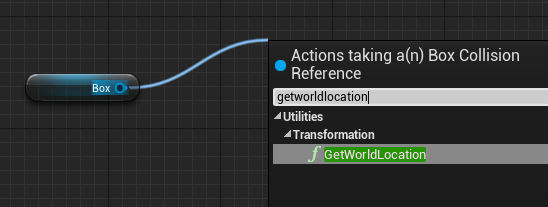
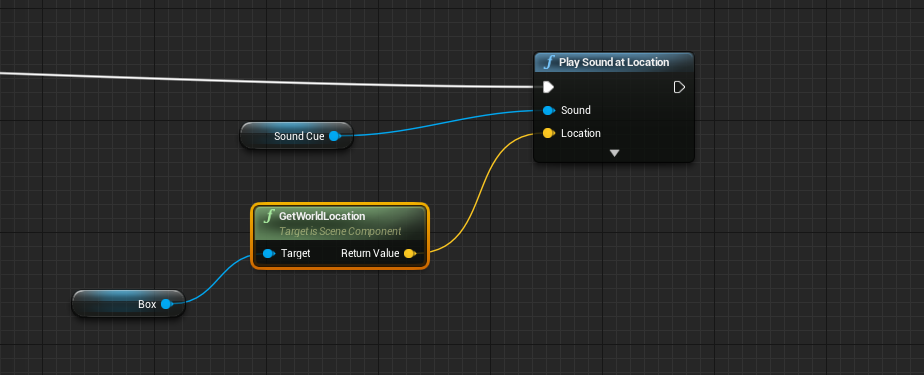
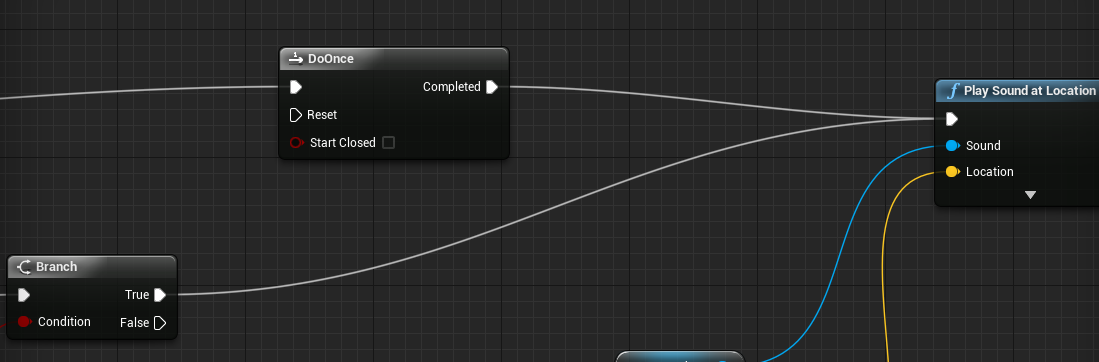
Once the function is now active you need to attach the sound function to the code. From the DoOnce node, pull out a new node from the completed pin and search for "play sound at location" To add your own sound to this function from the edit window instead of the blueprint window you need to add a new variable. The type of variable this will be is a "SoundCue" variable. You can search for this where you would select boolean in the details section. It is always easier to use the search function for this. When this is created you need to drag the variable into the code and "Get" the variable. This is then linked to the "Sound" peg in the play sound node. To make this viewable in the edit window you need to make this editable from the details panel. Next you need to set a location for the sound. However because we want to use this blueprint for multiple sounds you will need to bring in your collision box variable from the variables tab. This is labelled with a blue 3D box. You need to get this variable to be able to link this up with the location pin on the play sound node. To do this you need to pull a new node from the box variable pin and search for "GetWorldLocation" and then link this node up with the location pin on the play sound node. Below is the sequence to the following instructions in order. (Remember to compile and save!)


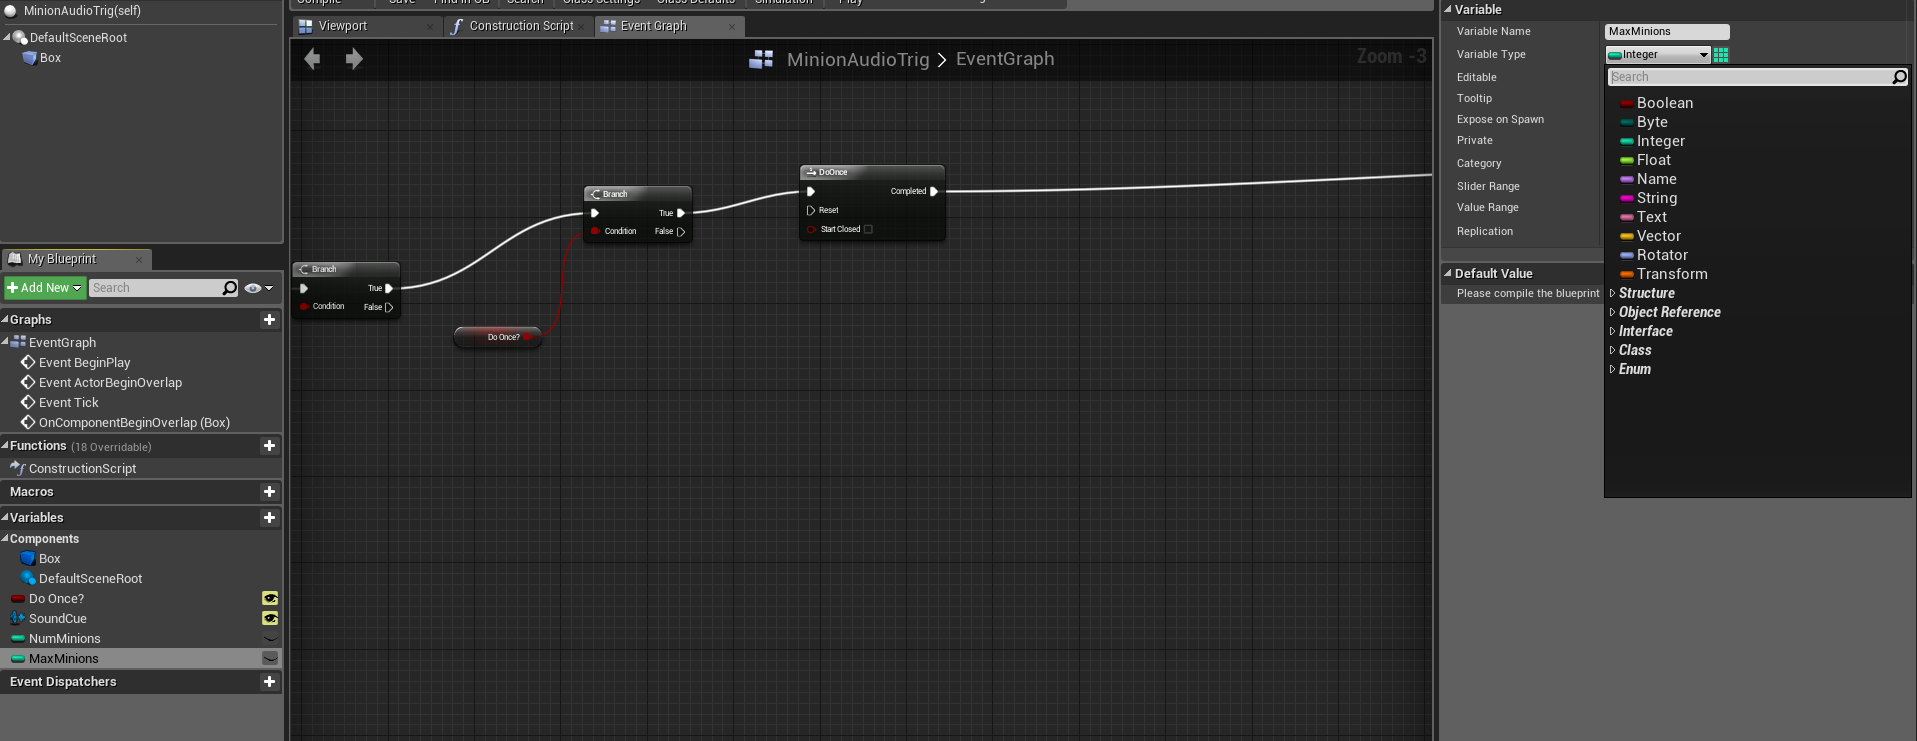
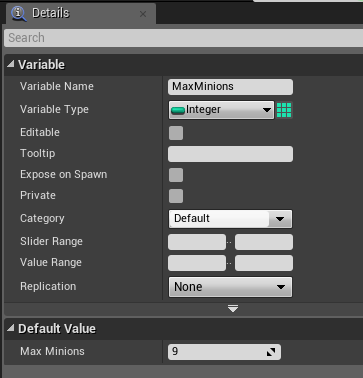
Now is for the part of the code that always goes wrong, so follow these instructions carefully. This part of the code will make the audio trigger register a certain amount of minions to only play a sound once every certain number of minions pass through. To start this code you first need two new variables called "Number of minions"(NumMinions) and one for "Max Minions". These variables need to be set to the type "Interger" because the Interger variables deal with the numbers within this engine.


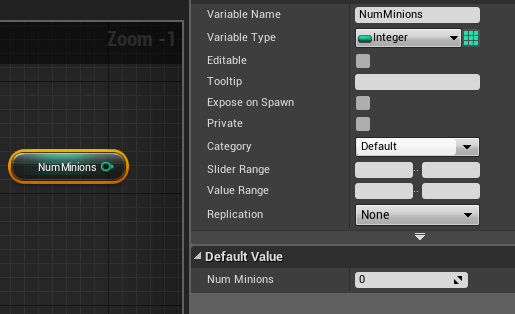
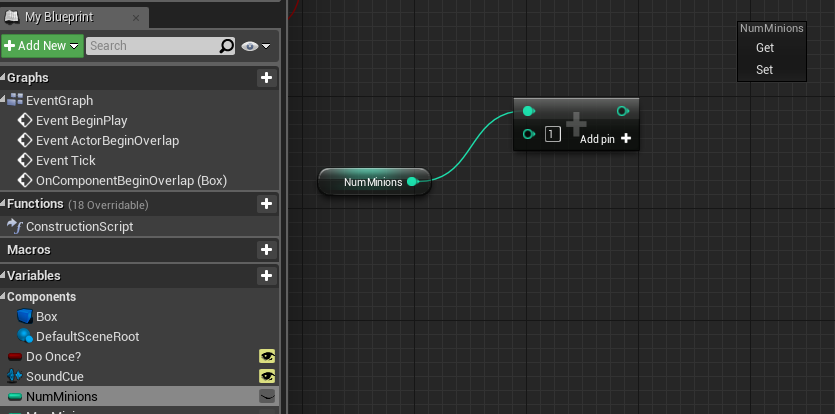
Now to start importing the variables, you are going to first drag in your number of minions value and "Get" the value of this variable. It is important in this stage to compile after every variable you import and edit in the code. This is so you can edit the value on the minions. The value of this variable should be set to zero so the maths of this code starts from zero and not one.


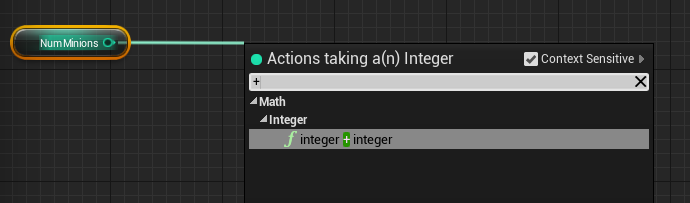
After this variable is set you need to drag out a new node from the number of minions pin. You need an "interger + interger" pin (In the search bar you can just put the plus icon (+) and you will find it in the first result).


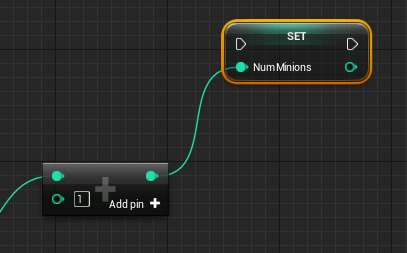
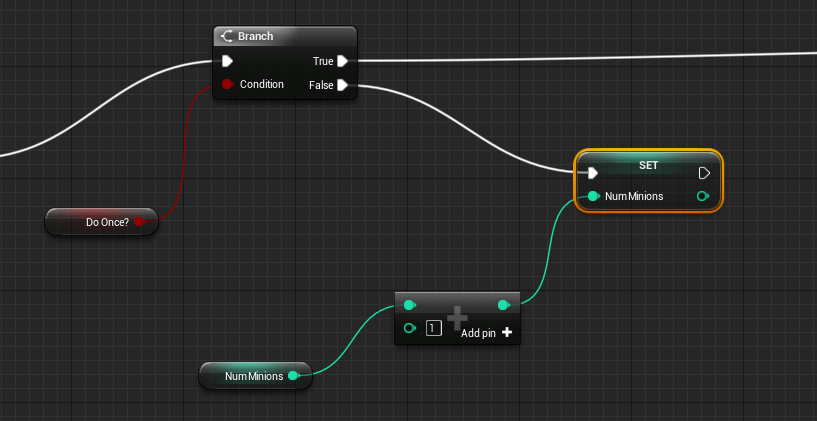
In this new variable node you need to have the value in the node set to 1. This should be set as a default but always check if it is not. From this you need to have a "Set" variable in place. To do this you need to drag the number of minions variable into the blueprint and "Set" it.Then link up the interger + interger nodes so this completes the flow if the code. You also need to link up the set variable for the number of minions to the second branch in your code with the DoOnce variable attached to it. This will be linked up via the False pin to the left side of the Set variable.


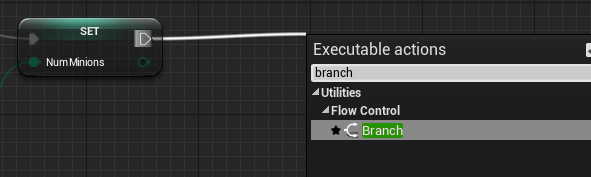
Now from the Set variable you need to pull out a new branch function from the right pin of the variable.


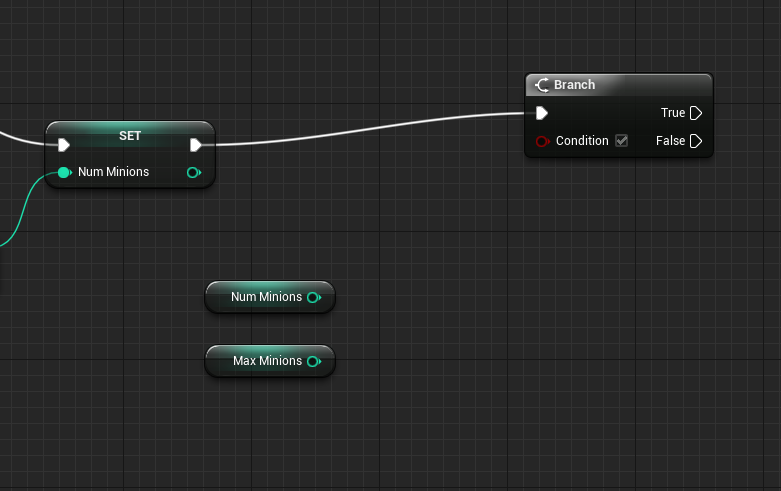
Now you will need to get both of your interger variables. Grab these from the variables section (Number of minions and Max Minions) and put then between your new branch and your set value. When they have been imported, make sure you compile! This is so you can get the settings of the variables. When imported and compiled set the "Max Minions" value to how many minions you want to pass through before the sound plays again. This is found when the Max Minions variable is selected and in the details panel under "Default Value".


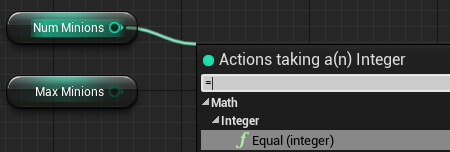
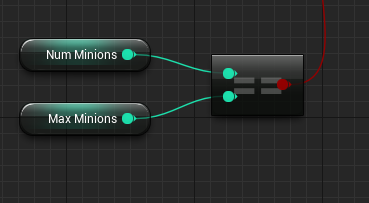
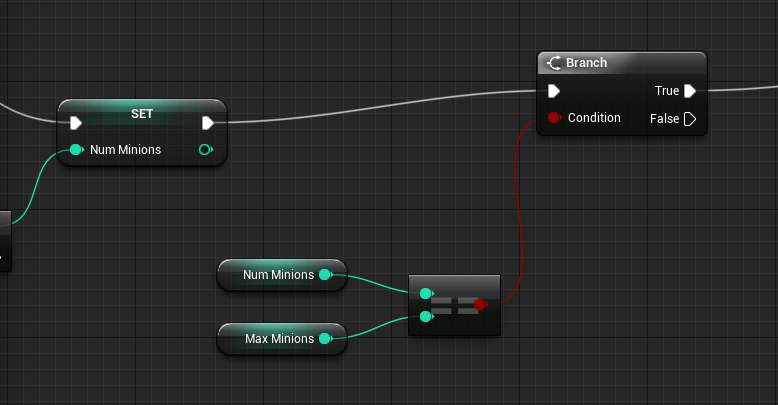
These variables now need to come and connect to each other. This is done be using an "Equal (Interger)" node. Drag one out from the number of minions variable and connect both of the variables to the Equal node as shown below.


You then need to link up the Equal node with the condition pin on the Branch you have set this up next to (near the "Set" variable for the number of minions).


This branch then connects to the play sound at location node at the end of the code.


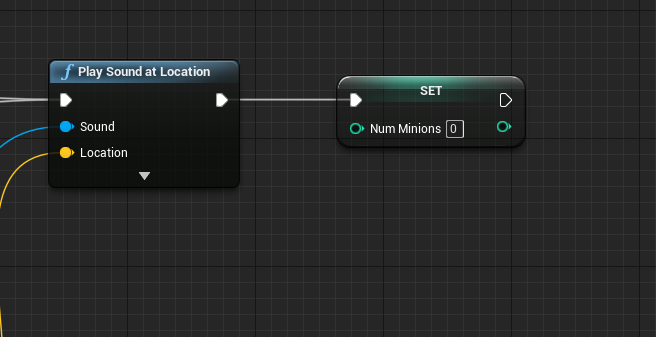
We are almost done with the code now. The final action you have to do is reset the number of minions. To do this you need to "Set" the number of minions variable and place this at the end of your code (next to sound at location). The value of this should be set to zero so it will reset. This node should be linked with the out pin on the right of the play sound at location node. Once the variable is in place, compile and save the code again. The code is now done.


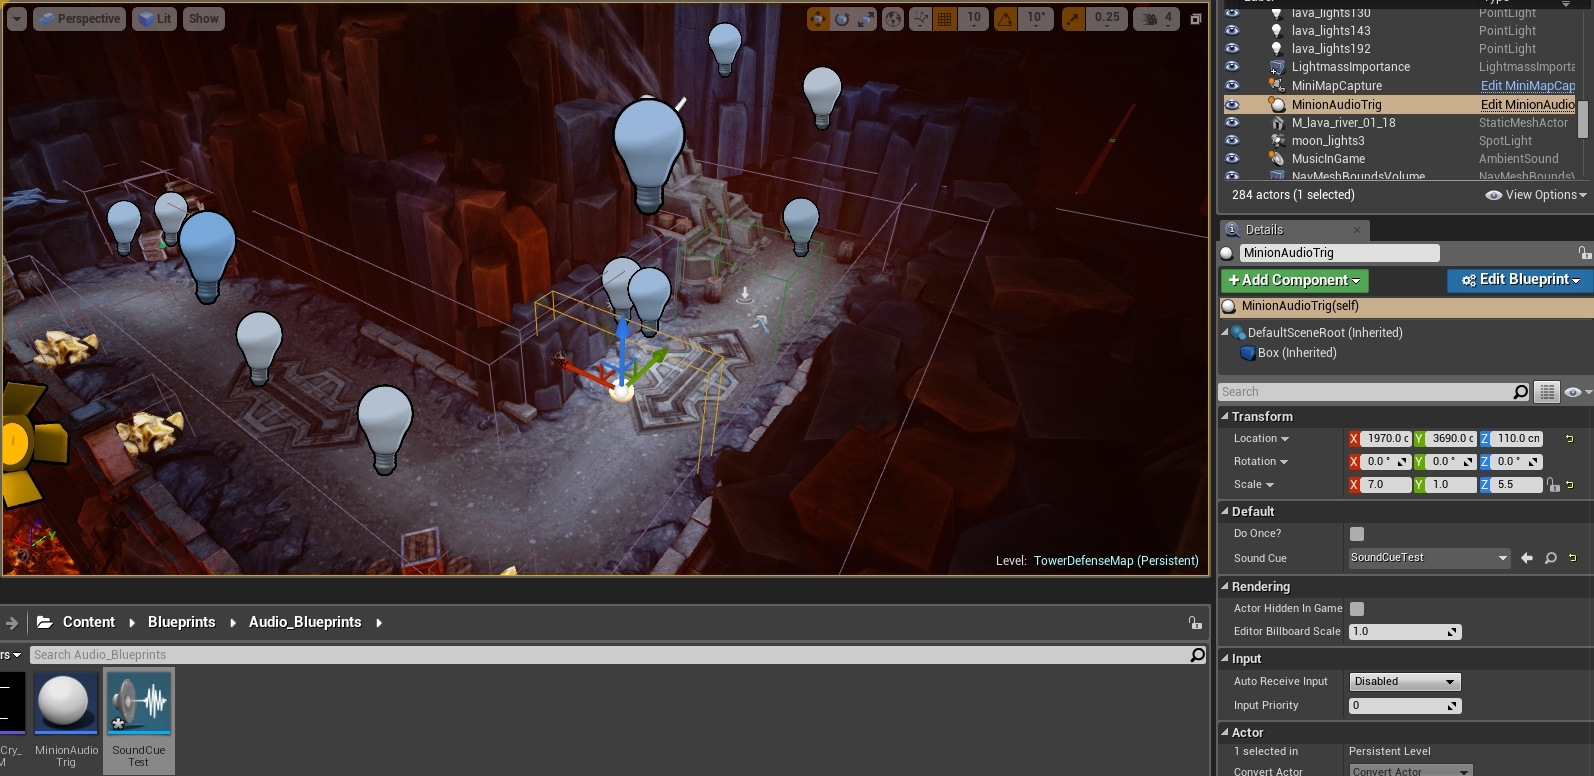
You can now place this blueprint into your game world and put attach sound cues to this in the "Default" section of the details panel. Do with this code as you wish. It can be adapted to with multiple codes however that is for you to figure out. 


Hope this blog has helped you out and happy coding! :D

Don't get to stressed now!

Wednesday, 10 February 2016

Creating A World With Sound


Hello to all!

Creating a world with sound is a lot more important than you can imagine. When you are working on a film and you are wandering why something does not sound right with the sound effects or your dialogue. None of that is going to sound right without the proper world to place these sounds into. Working with backgrounds could well be one of the most important jobs in sound design to be given, because you have to escape the image on screen that you are working with. When working with film this becomes step one for sound. Yes at first you will think you need massive impact sounds and fighting sounds but you must first ask yourself "where is this set in?" That is the main question that must be answered. You could be working with films like the hobbit for example and you decide to put a police siren in the background. That is not going to fit. Even when you are working with backgrounds and are only working with room ambience, as a sound designer you need to breakout and build a universe that is outside of a small room that the scene may be set in.

To make this point clear imagine a scene that is set in a living room. The first thing that comes to your mind will be a television, a clock ticking or anything that should be in a living room making sound. Then ask yourself "What is outside?" You suddenly have a bigger picture to work with such as wind, cars crossing the window, people talking outside as they walk past the house. You can take this even further as to describe sounds that would possibly be half a mile away such as a busy motorway in the distance, a near by airport, a heard of sheep running across the road. There is a whole word waiting for you to be made! Make the world your own. It can fit the scene easily by mixing it so the backgrounds are distant. Mixing is the key to make sure that you get the correct feel of the backgrounds and also towards making the scene a lot less quieter which is usually not good to have (unless you are working with horror).

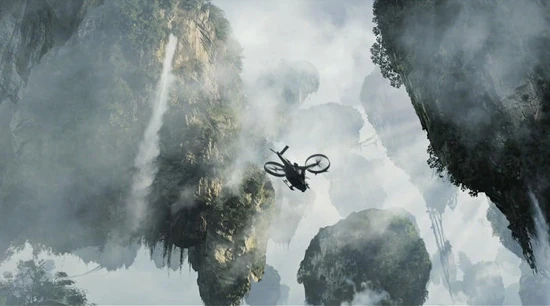
To show an example of how to create a world you need to look at the sci-fi genre of film. To pinpoint further lets look at Avatar. The backgrounds in the film are astonishingly accurate to what they look like, you want to go deeper and explore the world of Pandora. When you see the floating rocks for the first time you get a good listen to what the world of Pandora really sounds like and it is so vivid that you feel like you are there when you are watching it. This is what you need to aim for when you are doing backgrounds. Get the feel of reality and breakout of the box!


Shannon Mills Avengers Endgame Audio interview

Hello fellow button pushers! After seeing Avengers Endgame I was in awe over how the entire production team made this gigantic scale of...